Risk Management in Crypto Trading: Protect Your Capital

Why 90% of traders lose money and how proper risk management changes everything. Learn position sizing, stop loss strategy, risk-reward ratios, and profit locking techniques that keep you in the game.

Why Most Traders Lose Money (And How to Be Different)

The statistic is brutal and well-documented: roughly 90% of retail traders lose money. In the crypto market, where volatility is significantly higher than traditional markets, that number may be even worse. But here is the thing that most people miss -- the majority of these losses are not caused by bad analysis or wrong market predictions. They are caused by poor risk management.

Think about it. A trader can be right 60% of the time and still blow their account if their losing trades wipe out more than their winners. Conversely, a trader can be wrong 60% of the time and still be profitable if their winners are significantly larger than their losers. The difference is not prediction accuracy. The difference is how you manage risk on every single trade.

Risk management in crypto trading is not a single technique. It is a comprehensive framework that covers position sizing, stop loss placement, risk-reward ratios, profit locking, and portfolio-level rules. Master these five pillars, and you give yourself the statistical edge that separates the 10% who survive from the 90% who do not.

This guide walks through each pillar in detail, with practical examples of how ChartsTrack enforces risk management discipline automatically so you never have to rely on willpower alone.

Pillar 1

Position Sizing: The 1-2% Rule

Position sizing is the single most important risk management tool available to you. It answers the question: how much of my capital should I put into this trade?

The widely accepted rule among professional traders is to never risk more than 1-2% of your total trading capital on any single trade. If you have a $10,000 account, that means your maximum loss per trade should be $100 to $200.

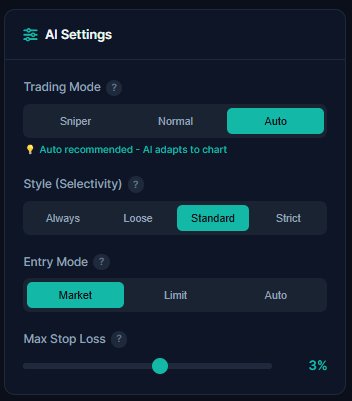
ChartsTrack enforces this discipline through its trading mode system. When you configure your AI settings, you choose between two modes that directly control your stop loss distance and, by extension, your position sizing:

  • Sniper Mode (1% SL): Tight stop losses requiring precise entries. Ideal for experienced traders who want maximum capital efficiency with minimal risk per trade
  • Normal Mode (3% SL): Wider stop losses that give trades more room to breathe. Better for swing trades or volatile pairs where price needs space to develop
  • Auto Mode: The AI selects the optimal SL distance based on chart structure, volatility, and support/resistance levels

Under the hood, these modes use ATR (Average True Range) to calculate technically sound stop-loss distances. Sniper mode uses 1.5x ATR, ensuring the SL sits just beyond normal price noise while keeping risk tight. Normal mode uses 2-2.5x ATR, giving the trade more room to breathe through standard volatility. This ATR-based approach means your stop-loss adapts to the actual volatility of each specific token rather than using a rigid fixed percentage that might be too tight for volatile altcoins or too wide for stable large-caps.

The beauty of a predefined SL percentage is that it forces you to calculate your position size before entering. If your SL is 1% from entry and you only want to risk $100, your maximum position size is $10,000. This calculation prevents the most common mistake: entering with a position size based on hope rather than math.

ChartsTrack AI settings showing Sniper and Normal trading modes with configurable stop loss percentages

Risk-Reward Ratio: Why 1:2 Minimum Matters

Your risk-reward ratio (RR) defines the relationship between what you stand to lose and what you stand to gain on each trade. A 1:2 RR means you risk $1 to make $2. This is not just a nice guideline -- it is the mathematical foundation that makes long-term profitability possible.

Here is the math that proves it. With a 1:2 risk-reward ratio, you only need to win 34% of your trades to break even. Win 40% and you are solidly profitable. Win 50% and you are building serious wealth. Compare that to a 1:1 ratio where you need to win over 50% just to break even after fees and slippage.

ChartsTrack structures every trade setup with a multi-target profit system designed to achieve effective RR ratios of 1:2 or better:

This dual-target approach is powerful because it combines capital protection with profit maximization. The TP1 close ensures you rarely give back all your gains. The TP2 target ensures your winners are substantially larger than your losers. Combined, the effective risk-reward of the full position often exceeds 1:1.5 to 1:3, which puts the math heavily in your favor over time.

Never enter a trade where the potential reward does not justify the risk. If you cannot identify a realistic TP2 target that gives you at least 2:1 RR, the trade is not worth taking regardless of how good the chart pattern looks.

Pillar 3

Stop Loss Placement: Where, Why, and When to Move It

A stop loss is not just a number you pick randomly below your entry. Proper stop loss placement is a technical decision based on market structure, not arbitrary percentages. The best stop loss is placed at a level where, if price reaches it, your original trade thesis is genuinely invalidated.

ChartsTrack's AI analyzes chart structure across multiple timeframes to place stop losses at technically meaningful levels. This means your SL sits behind key support or resistance zones, below swing lows or above swing highs, where price would need to break genuine structure to trigger it.

But placement is only half the equation. Stop loss management during the trade is equally critical:

  • After TP1 hit: The AI automatically moves your stop loss to breakeven. This means even if the trade reverses completely after TP1, you lose nothing on the remaining position
  • RR-level trailing: After TP1, the stop-loss progressively trails through risk-reward levels (1R, 1.5R, 2R) as price advances, locking in more profit with each level reached
  • Never move SL further away: One of the cardinal rules. If price is approaching your SL, moving it further away to "give the trade more room" is denial, not strategy. It increases your risk on a trade that is already going against you

The trade levels card shows you exactly where your entry, SL, TP1, and TP2 sit relative to current price. This visual clarity removes the emotional decision-making that causes traders to widen their stops or remove them entirely when fear takes over.

ChartsTrack trade levels showing entry, stop loss, TP1, and TP2 placement on a live trade
Pillar 4

Multi-TP Profit Locking: Never Give Back All Your Gains

One of the most psychologically damaging experiences in trading is watching a winning trade turn into a loser. You were up 5%, then 3%, then 1%, then negative. You held the entire time because you were "waiting for TP" and ended up with nothing -- or worse, a loss.

ChartsTrack's profit locking system is specifically designed to prevent this scenario. Here is how it works step by step:

  • Step 1 -- TP1 hit: When price reaches your first take profit target, 50% of your position is closed. This profit is locked and cannot be taken away by subsequent price movement
  • Step 2 -- SL to breakeven: Simultaneously, the stop loss on your remaining 50% is moved to your entry price. The remaining position is now a free trade with zero downside risk
  • Step 3 -- Ride to TP2: The remaining 50% targets TP2 at 2:1+ risk-reward. If it hits, you capture significant additional profit. If price reverses and hits your breakeven SL, you still walk away with the TP1 profit locked in

This locked P&L system means your trade outcome has only three possible scenarios: full win (both TPs hit), partial win (TP1 hit, SL at breakeven), or loss (SL hit before TP1). Two out of three outcomes are profitable or neutral. That is the power of systematic profit locking.

The screenshot shows a live trade where TP1 has been reached. Notice the locked profit indicator and the SL moved to breakeven. The trader has already secured gains regardless of what happens next.

ChartsTrack showing TP1 hit with 50% profit locked and stop loss moved to breakeven

Portfolio Risk Rules: The Big Picture

Individual trade risk management is essential, but it is not sufficient. You also need portfolio-level rules to protect against correlated losses and black swan events. Here are the key portfolio risk management principles every crypto trader should follow:

These are not suggestions -- they are survival rules. The crypto market will be here tomorrow. Your capital might not be if you ignore these principles during a volatile period.

The #1 Reason Traders Blow Their Accounts

No stop loss. It sounds almost too simple to be the leading cause of account destruction, but it is. Traders enter a position, it moves against them, and they convince themselves it will come back. "It is just a dip." "I will exit at breakeven." "The trend is still intact." Meanwhile, the loss grows from 2% to 5% to 10% to 30%. By the time they finally exit, the damage is catastrophic. A single trade without a stop loss can erase months of careful, disciplined trading. Every trade needs a stop loss. No exceptions. Ever. ChartsTrack sets stop loss levels automatically on every trade setup, so you never have to make that critical decision under emotional pressure.

Risk Management That Works Automatically

ChartsTrack builds these three core risk management practices into every trade setup and monitoring session

Position Sizing

Sniper (1% SL) and Normal (3% SL) modes enforce disciplined position sizing. The AI calculates optimal stop loss distance based on market structure, so your risk per trade is always predefined and controlled.

Stop Loss Discipline

Every trade setup includes a technically-placed stop loss at a structural invalidation level. After TP1, the SL automatically moves to breakeven. No manual intervention needed. No emotional second-guessing.

Profit Locking

The 50/50 TP system closes half your position at TP1 and locks in profit. The remaining half rides to TP2 as a risk-free trade. Two out of three possible outcomes are positive or neutral.

Common Questions About Risk Management

How much should I risk per trade in crypto?

The general rule is to risk no more than 1-2% of your total trading capital on any single trade. For highly volatile crypto markets, many experienced traders stick to 1% or less. ChartsTrack's Sniper mode enforces tight 1% stop losses to help you maintain this discipline automatically. With a $10,000 account and 1% risk per trade, your maximum loss on any single position is $100, meaning you could withstand 50 consecutive losing trades before significant account damage.

What is a good risk-reward ratio for crypto trading?

A minimum risk-reward ratio of 1:2 is recommended for most crypto trades. This means for every $1 you risk, you should target at least $2 in profit. ChartsTrack uses a multi-TP system where TP1 is at approximately 1:1 RR for partial profit locking, and TP2 targets 2:1 or higher for the remaining position. The combined effective RR of the full trade often exceeds 1:1.5 to 1:3, which allows you to be profitable even with a sub-50% win rate.

Should I use a stop loss for every crypto trade?

Absolutely yes. Trading without a stop loss is the single most common reason traders blow their accounts. Every trade should have a predefined stop loss before you enter. ChartsTrack automatically calculates and sets stop loss levels based on technical analysis and chart structure, ensuring every trade has built-in risk protection from the moment you receive your trade setup.

Related Articles

Continue learning about disciplined, profitable crypto trading

Trade with Built-In Risk Management

Every ChartsTrack trade setup includes automatic position sizing, stop loss placement, and multi-TP profit locking. Start protecting your capital today.